介绍 Microsoft Olive
Olive 是一个易于使用的硬件感知模型优化工具,它汇集了模型压缩、优化和编译领域的行业领先技术。
它旨在简化机器学习模型的优化过程,确保它们在特定硬件架构上实现最有效的使用。
无论您是在云基础应用还是边缘设备上工作,Olive 都能让您轻松有效地优化模型。
关键特性:
- Olive 聚合并自动化了针对所需硬件目标的优化技术。
- 没有单一的优化技术适合所有场景,因此 Olive 允许通过使行业专家能够插入他们的优化创新来扩展。
减少工程工作量:
- 开发人员通常需要学习并使用多个硬件供应商特定的工具链来准备和优化训练后的模型以进行部署。
- Olive 通过自动化针对所需硬件的优化技术来简化这一体验。
即用型端到端优化解决方案:
通过组合和调整集成技术,Olive 提供了一个统一的端到端优化解决方案。 在优化模型时,它考虑到了准确性和延迟等约束。
使用 Microsoft Olive 微调 Phi-3
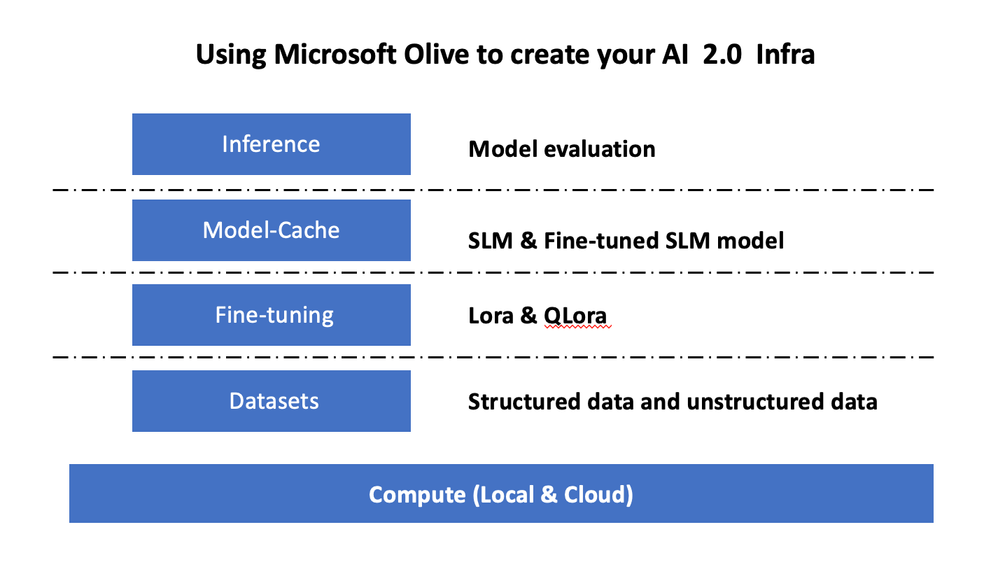
Microsoft Olive 是一个非常好用的开源模型优化工具,它可以涵盖生成式人工智能领域的微调和推理。它只需要简单的配置,结合使用开源小型语言模型和相关运行时环境(AzureML/本地GPU、CPU、DirectML),您就可以通过自动优化完成模型的微调或推理,并找到最适合部署到云端或边缘设备的模型。这使得企业能够在本地和云端构建自己的行业垂直模型。
设置 Microsoft Olive
Microsoft Olive 的安装非常简单,也可以为 CPU、GPU、DirectML 和 Azure ML 安装。
设置 Microsoft Olive Microsoft Olive 的安装非常简单,也可以为 CPU、GPU、DirectML 和 Azure ML 安装。
pip install olive-ai
如果您希望使用 CPU 运行 ONNX 模型,您可以使用:
pip install olive-ai[cpu]
如果您想使用 GPU 运行 ONNX 模型,您可以使用以下命令来安装 Olive 的 GPU 版本:
pip install olive-ai[gpu]
如果您想使用 Azure ML,您可以使用以下命令来安装 Olive 的 Azure ML 版本:
pip install git+https://github.com/microsoft/Olive#egg=olive-ai[azureml]
这些命令将帮助您根据需要安装 Olive,以便在不同的硬件和平台上优化和运行您的机器学习模型。
通知
操作系统要求:Ubuntu 20.04 / 22.04
Microsoft Olive 的 Config.json
安装完成后,您可以通过 Config 文件配置不同的模型特定设置,包括数据、计算、训练、部署和模型生成。
1. 数据
在 Microsoft Olive 中,可以支持本地数据和云端数据的训练,并可以在设置中进行配置。
本地数据设置
您可以简单地设置需要进行微调训练的数据集,通常为 json 格式,并根据数据模板进行适配。这需要根据模型的要求进行调整(例如,适配到 Microsoft Phi-3-mini 所需的格式。如果您有其他模型,请参考其他模型所需的微调格式进行处理)。
    "data_configs": {
        "dataset-default_train": {
            "name": "dataset-default",
            "type": "HuggingfaceContainer",
            "params_config": {
                "data_name": "json",
                "data_files":"dataset/dataset-classification.json",
                "split": "train",
                "component_kwargs": {
                    "pre_process_data": {
                        "dataset_type": "corpus",
                        "text_cols": [
                            "phrase",
                            "tone"
                        ],
                        "text_template": "### Text: {phrase}\n### The tone is:\n{tone}",
                        "corpus_strategy": "join",
                        "source_max_len": 1024,
                        "pad_to_max_len": false,
                        "use_attention_mask": false
                    }
                }
            }
        }
    },
云端数据源设置
通过将 Azure AI Studio/Azure Machine Learning Service 的数据存储链接起来,您可以将云端的数据链接到 Azure AI Studio/Azure Machine Learning Service 中。您可以选择通过 Microsoft Fabric 和 Azure Data 将不同的数据源引入到 Azure AI Studio/Azure Machine Learning Service 中,以支持微调数据。
具体来说,您可以按照以下步骤进行设置:
-
链接数据存储:首先,您需要在 Azure AI Studio 或 Azure Machine Learning Service 中设置数据存储,以便能够访问云端的数据。
-
选择数据源:通过 Microsoft Fabric(可能指的是 Azure 的数据和AI服务的集成解决方案),您可以选择合适的数据源,这些数据源可以是各种类型的数据集,包括但不限于数据库、数据湖、文件存储等。
-
数据传输:将选定的数据源通过 Azure Data Factory 或其他数据传输服务传输到 Azure AI Studio/Azure Machine Learning Service,以便进行进一步的处理和分析。
-
配置 Config.json:在 Olive 的 Config.json 文件中,您需要配置相关的数据源信息,包括数据的路径、格式、预处理需求等,以确保 Olive 能够正确地加载和处理数据。
-
微调数据支持:确保引入的数据符合模型微调的要求,可能需要进行数据清洗、格式化转换等预处理步骤,以适配模型的输入需求。
通过这种方式,您可以利用 Azure 的强大云服务能力,为 Olive 提供丰富的数据资源,从而支持复杂的机器学习模型训练和微调任务。
    "data_configs": [
        {
            "name": "dataset_default_train",
            "type": "HuggingfaceContainer",
            "params_config": {
                "data_name": "json",
                "data_files": {
                    "type": "azureml_datastore",
                    "config": {
                        "azureml_client": {
                            "subscription_id": "396656ae-1e4b-4f9d-9a8a-a5fcb0296643",
                            "resource_group": "AIGroup",
                            "workspace_name": "kinfey-phi3-mini-demo-ws"
                        },
                        "datastore_name": "workspaceblobstore",
                        "relative_path": "UI/2024-05-20_030716_UTC/dataset-classification.json"
                    }
                },
                "split": "train",
                "component_kwargs": {
                    "pre_process_data": {
                        "dataset_type": "corpus",
                        "text_cols": [
                            "phrase",
                            "tone"
                        ],
                        "text_template": "### Text: {phrase}\n### The tone is:\n{tone}",
                        "corpus_strategy": "join",
                        "source_max_len": 1024
                    }
                }
            }
        }
    ],
2. 计算配置
如果你需要本地化,可以直接使用本地数据资源。你需要使用 Azure AI Studio / Azure 机器学习服务的资源。你需要配置相关的 Azure 参数,计算能力名称等。 以下是一个简化的 Config.json 文件的示例,展示了如何配置 Azure 计算资源:
    "systems": {
        "aml": {
            "type": "AzureML",
            "config": {
                "accelerators": ["gpu"],
                "hf_token": true,
                "aml_compute": "Your Azure AI Studio / Azure Machine Learning Service Compute Name",
                "aml_docker_config": {
                    "base_image": "Your Azure AI Studio / Azure Machine Learning Service docker",
                    "conda_file_path": "conda.yaml"
                }
            }
        },
        "azure_arc": {
            "type": "AzureML",
            "config": {
                "accelerators": ["gpu"],
                "aml_compute": "Your Azure AI Studio / Azure Machine Learning Service Compute Name",
                "aml_docker_config": {
                    "base_image": "Your Azure AI Studio / Azure Machine Learning Service docker",
                    "conda_file_path": "conda.yaml"
                }
            }
        }
    },
通知
因为它是通过 Azure AI Studio/Azure 机器学习服务上的容器运行的,所以需要配置所需的环境。这在 conda.yaml 环境中进行配置。
name: project_environment
channels:
  - defaults
dependencies:
  - python=3.8.13
  - pip=22.3.1
  - pip:
      - einops
      - accelerate
      - azure-keyvault-secrets
      - azure-identity
      - bitsandbytes
      - datasets
      - huggingface_hub
      - peft
      - scipy
      - sentencepiece
      - torch>=2.2.0
      - transformers
      - git+https://github.com/microsoft/Olive@jiapli/mlflow_loading_fix#egg=olive-ai[gpu]
3. 选择你的SLM
你可以直接从 Hugging face 使用模型,或者你可以直接将其与 Azure AI Studio / Azure 机器学习的模型目录结合起来选择要使用的模型。这里我以 Microsoft Phi-3-mini 为例。
如果你有本地的模型,你可以使用这种方法。
    "input_model":{
        "type": "PyTorchModel",
        "config": {
            "hf_config": {
                "model_name": "model-cache/microsoft/phi-3-mini",
                "task": "text-generation",
                "model_loading_args": {
                    "trust_remote_code": true
                }
            }
        }
    },
如果你想使用来自 Azure AI Studio / Azure 机器学习服务的模型,你可以使用这种方法。
    "input_model":{
        "type": "PyTorchModel",
        "config": {
            "model_script": "qlora_user_script.py",
            "model_path": {
                "type": "azureml_registry_model",
                "config": {
                    "name": "microsoft/Phi-3-mini-4k-instruct",
                    "registry_name": "azureml-msr",
                    "version": "11"
                }
            },
             "model_file_format": "PyTorch.MLflow",
             "hf_config": {
                "model_name": "microsoft/Phi-3-mini-4k-instruct",
                "task": "text-generation",
                "from_pretrained_args": {
                    "trust_remote_code": true
                }
            }
        }
    },
注意:
我们需要与 Azure AI Studio / Azure 机器学习服务集成,因此在设置模型时,请参考版本号和相关命名。
Azure 上的所有模型都需要设置为 PyTorch.MLflow。
你需要有一个 Hugging face 账户,并将密钥绑定到 Azure AI Studio / Azure 机器学习的 Key 值。
4. 算法
Microsoft Olive 非常好地封装了 Lora 和 QLora 微调算法。你只需要配置一些相关参数。这里我以 QLora 为例。
        "qlora": {
            "type": "QLoRA",
            "config": {
                "compute_dtype": "bfloat16",
                "quant_type": "nf4",
                "double_quant": true,
                "lora_r": 64,
                "lora_alpha": 64,
                "lora_dropout": 0.1,
                "train_data_config": "dataset_default_train",
                "eval_dataset_size": 0.3,
                "training_args": {
                    "seed": 0,
                    "data_seed": 42,
                    "per_device_train_batch_size": 1,
                    "per_device_eval_batch_size": 1,
                    "gradient_accumulation_steps": 4,
                    "gradient_checkpointing": false,
                    "learning_rate": 0.0001,
                    "num_train_epochs":3,
                    "max_steps": 1200,
                    "logging_steps": 10,
                    "evaluation_strategy": "steps",
                    "eval_steps": 187,
                    "group_by_length": true,
                    "adam_beta2": 0.999,
                    "max_grad_norm": 0.3
                }
            }
        },
需要指出的是,你可以根据自己需要设置上述步骤。并不需要完全配置上述五个步骤。根据你的需求,你可以直接使用算法步骤而不进行微调。最后你需要配置相关的引擎。
    "engine": {
        "log_severity_level": 0,
        "host": "aml",
        "target": "aml",
        "search_strategy": false,
        "execution_providers": ["CUDAExecutionProvider"],
        "cache_dir": "../model-cache/models/phi3-finetuned/cache",
        "output_dir" : "../model-cache/models/phi3-finetuned"
    }
5. 完成微调
在命令行中,在 olive-config.json 文件所在的目录下执行。
python -m olive run --config olive-config.json